I had one full day, and two evenings. Was it possible? That was the challenge.
The goal? The following Saturday I was running a Scything Festival at my work, and I had in my head that a cropped, narrow, corduroy culotte was what I wanted to wear. Actually, we need to reverse further than that.
One day after work I was getting the messages (buying our weekly food) in the local shop when I ended up shopping beside a woman in a denim onesie. You know when you end up shopping at the same speed as someone else and you develop an awkward dance involving trolleys and ‘excuse me‘s and eventually you have to say something more? Well, this time it was easy and I warmly complimented her jumpsuit, saying how lovely it was. She thanked me and then looked me up and down, clearly seeking something (anything) to compliment in return. And clearly drawing a blank, she returned her attention to my face and said “thank you, it’s so comfy”. And thus our dance resumed.
This niggled me all the journey home until it clicked: I have lots of lovely clothes that show my personality and that I feel like myself in. My work clothes don’t come under either category, but due to the rigors of my job, I need my clothing to be functional, but surely I can be functional and still fun?!

And so we return to the lead up to our Scything Fest. The reason I wanted to wear a cropped, narrow, corduroy culotte to this event was it was the perfect opportunity to start injecting some ‘me’ into my workwear. And so the plan was born.
I purchased the fabric first from Sew Me Sunshine. It’s a stretch corduroy in colourway sage green, and I at first envisioned it being a new pair of Sasha trousers, but it wasn’t right for that when it arrived – too wide a wale, too pale a colour. In fact, the colour was too peely wally for me overall and so to make it into something more me I put it through the wash with a sachet of grey Dylon dye and instead of Sasha, I decided on this cropped-narrow-corduroy-culotte idea (just going to abbreviate this to CNCC from now on) but I didn’t have a pattern.
I considered several: Workhorse Pattern’s new Hazel is gorgeous, I love Workshop’s Emily culottes, but then I remembered I had New Look 6459 in my library and decided on it. But then as I was pondering this more, I realised I wanted a fly front, and back pockets and belt loops so that I could attach my forager’s pouch for more functionality. I wanted to be able to really wear these, remember, and I just don’t think invisible zips are right for heavy wear clothes. So back to the drawing board… or was it? I thought about the fly front garments I have made in the past – Ginger jeans, Sasha trousers, Opian shorts and Ness skirt. Of the three made for me, I think Ness is my favourite, and I decided to amalgamate the two patterns together – the waist to the hips of the Ness skirt (with the back pockets of the Gingers as Ness’ are slightly small) and the rest of the garment taking the lead from the New Look pattern.

So that evening, nervous of taking the plunge but knowing that I didn’t have time to toile, I frankensteined my pattern and boldly stepped where I have never stepped before…
Piecing the two patterns together was surprisingly easy. They both had hip notches that aligned perfectly (the sizes were absolutely spot on), and so I just used that. I laid the Vogue pattern over the Ness, lined up the notches and made sure the grainlines were parallel, traced over and that was it! And then I had a moment of doubt, and added extra length on for the crotch – two inches in the back as I was reducing the yoke height by an inch, and one inch in the front.
Adjustments made, I cut out the patterns and then the fabric. I did the fabric on a single layer as during the dyeing process I had managed to end up with some over-dyed areas due to a silly mistake when putting the dye in the machine. Once I’d laid out the fabric I realised it was also burnt from where I’d dried it on the heated drier. Sigh, so I had dark patches of dye and brown, burnt lines to avoid which wasn’t entirely easy, but mainly successful (and I really don’t think anyone will notice any imperfections anyway – I tried to get photos of them but the camera couldn’t seem to capture them at all).

Then it was onto the sewing. And it was great. With my Ness skirt to guide me through the instructions I got to it. The zip insertion was interestingly more complex than I remember the first round being, but I got there in the end (never assume experience, my friends). I then basted the sides to test the fit and they were trousers – success! They were trousers that were too big, in fact – I really did not need the extra crotch length. To fix this, at the top of the side seams I started the seam allowance at 2.5cm, reducing to the standard 1.5cm by the hip notch. Then, for the crotch I took an inch off the back and 1.5″ off the front to create as close to a perfect fit as I believe it possible to get this far through the process. For my next pair I will remove the inches I put in and see if that sits better.
I did need to do some pretty major adjustments to get it to fit right around the small of my back. I don’t really think I have a swayback, but following the first fitting I pinched out two inches from where the yoke met the back seam, and graded this out to nothing over a distance of 6″, and at the top of the yoke I reduced that by 1″, so my yoke shrunk dramatically. I really love the fit now, but I need to work out how to transfer this to paper, as all the adjustments did make the insides a bit chaotic in this area.

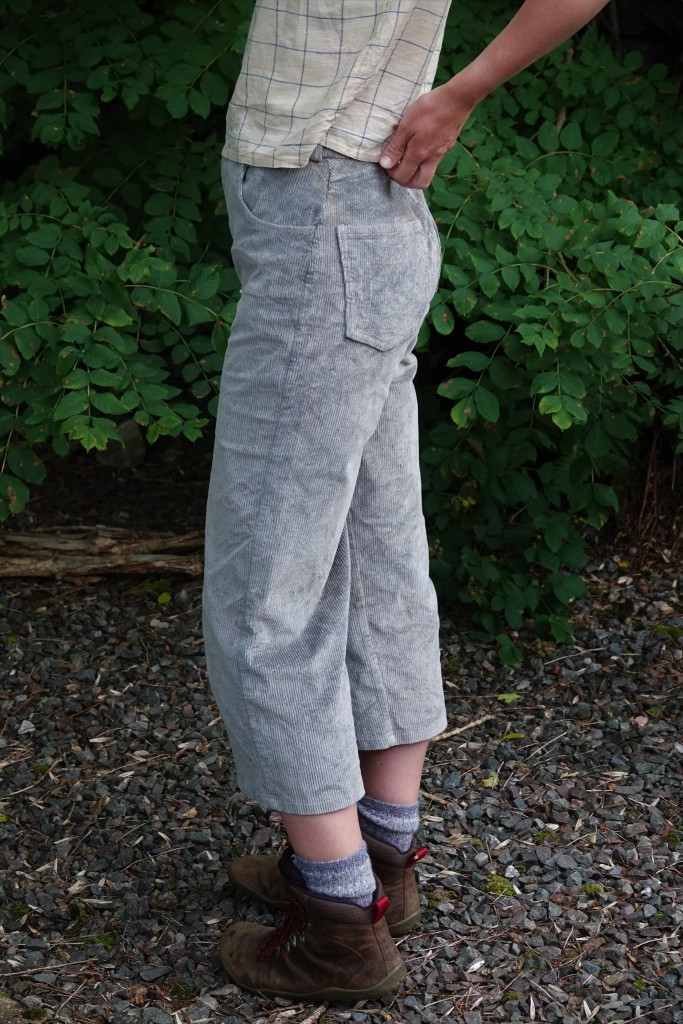
Choosing a divinely soft brushed cotton for the pocket bags and inside of the waistband made me very happy – and continues to do so every time I put my hands in my pockets (as you can tell by the fact I failed to get a single photo without my hands in my pockets!!). For the waistband, as I have had trouble of waistbands stretching out in the past, I used stiff interfacing on both the facing and the main pattern piece and it’s definitely my favourite waistband to date. When I put on my jeans button, however, I put it too far across, carefully lining it up with the centre of the overlap, rather than the end of the waistband. A quick cry for help saved me: you can remove these by using wire cutters on the button shaft, and although it leaves a wee hole it’s nothing drastic (thank you @ceithern and @cottuscognatus). I did a nifty zig zag to stop fraying and popped a heavy duty (camping gear) popper on the waistband instead, as the recently decapitated button was the last jean button I had.


And then a quick hem and they were done. I did add some special details though. On the rear pockets I added some very, very subtle embroidery. As these were made for the first ever scything festival, I stitched ‘grass’ on one pocket, and on the other a straight line, to signify that the grass has been cut. This makes me smile so much, though no one else will probably ever notice, I will and do (and they’re my trousers so I am the only one that matters, right?!). I also added one of Kylie and the Machine’s limited edition tags that says ‘stand tall’. And then they really were done.
I have worn them a lot since making them. The scything festival was their perfect first wear and they definitely brought luck for the day, which turned into a real success. I’ve worn them to a first aid course (so they have lain on the floor, been put in the recovery position, and rescued many injured folks!), and both for work and play. I feel like myself in them, and there is nothing better to feel. In addition, the fabric stays nice and doesn’t stretch out unduly. All in all a great success.

Things to change for next time:
- Lengthen the fly zip!! Annoyingly, I could have done this as I shortened the zip to fit this fly, but I forgot that high waisted garments definitely need longer zips.
- Make all the adjustments mentioned above before cutting out the pattern pieces
- Check the balance of the legs as I think they might be s-ligh-tly off
- Trust thyself (don’t add inches here and there just for the sake of it)
And I think that’s it! Nothing drastic. Oh, I did deepen the front pocket hole by about an inch at the side as on Ness it’s just that wee bit high and difficult to access, and I need to also deepen the pocket facing as the edge of it does poke out sometimes. But really, we’re now getting into the realm of nit picking, and in actual fact I love these trousers! More will be on the horizon in the future.

My top is new this summer too, and will be made again in future as it’s a real favourite. It’s the Emmeline Tee by Tailoress Studio and I highly recommend the pattern. Goes up to 44″ bust (so is not inclusive, sorry… have emailed Ami to encourage expansion) and I love it. Will be making the raglan version next. The fabric is from Wild Orchard Fabrics , is sold out, but I highly recommend Lottie’s collection in general. All-round, a real winning outfit 😉


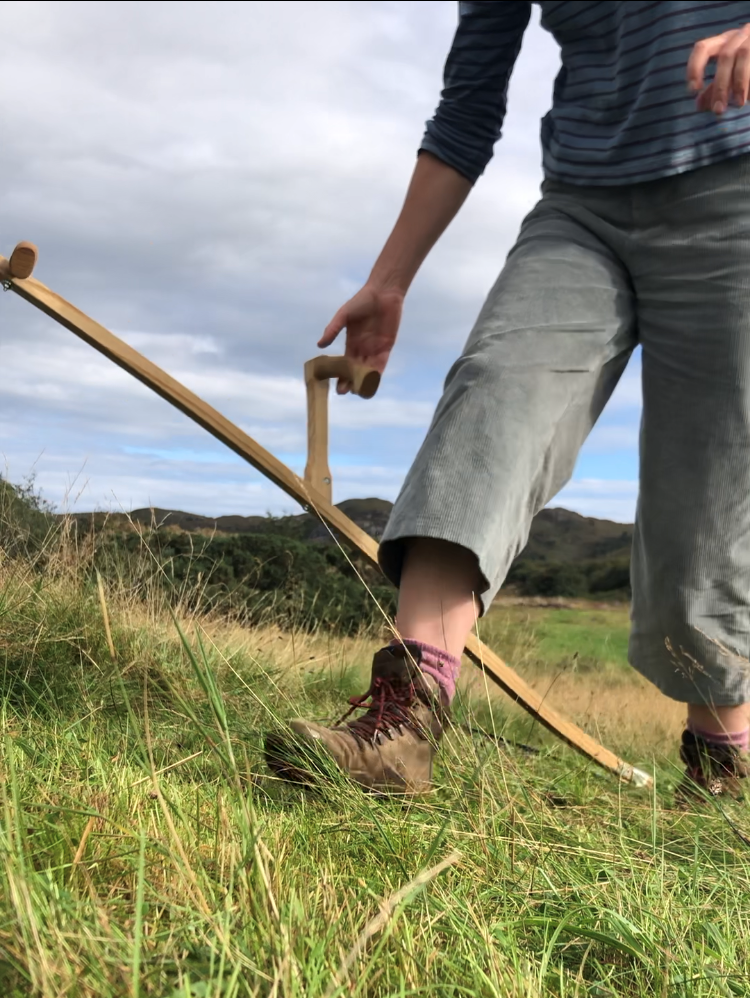
Photos taken in our new garden. It’s been a bit overcast recently and as time was marching on, trying to get posed scything photos didn’t really work. However, here’s some excellently realistic candid photos of me doing some recent scything work. All just screenshotted from a video.


I love them. The pockets are gloriously deep, the waistband stays in place. They allow me to be flexible and are non-constrictive. I might use this pattern to make other work trousers, including a full-length pair that are narrow at the ankle, but I also would like to try this pattern and I am sure it’ll make it onto the blog at some point! As of writing, I have already gotten paint on my culottes, but I am hopeful it’ll come out. Will love them no matter what little stains they pick up: long live the CNCC!

I love this! You really put your all into it and it looks perfect on you. Hope the festival is (or was) successful. Best, Deb Moyers
LikeLiked by 1 person
Thank you! After a lot of stress and last minute nerves the festival was a huge success and I’m already planning next year’s!
LikeLiked by 1 person
Great CNCCs! I applaud your bravery and success Frankenpattering, as I have a hard enough time with a straight pattern, lol. There is nothing quite like feeling totally yourself in your Me-Mades! And you really must print, frame, and hang the last photo. It’s a work of art, and seems so YOU!
P.S. I’m wondering if you have any tick borne illness problems in Scotland? (Bare-ankle-wise.) That’s a real problem that’s affected my family here in NE USA… Although I still walk in the wilds wearing shorts. (Would that be British “short trousers”? I don’twalk around wearing what we call boxer shorts, ie underwear!)
LikeLiked by 1 person
Thank you!!! And good question. We do have tick-borne lymes disease here in Scotland and I get a lot of ticks whether my ankles are exposed or not. I used to take all the precautions and never let a bit of skin show all through summer and I was still getting more ticks than anyone so now I just accept that I get ticks but that the best thing to do is remove them as soon as I find them. And so far, touch wood, my plan has been successful!
Shorts are shorts here, pants are underpants /boxer shorts. Trousers are pants! 🤣 does this make sense?!! Haha.
LikeLiked by 1 person
Ayyy they’re beautiful! Well done going for exactly what you wanted! I love the color you ended up with too, it’s so subtle and natural – is it blue? Green? Grey? Yes to all, it seems! And the wide corduroy gives great body to the legs. Overall a total winner!!
LikeLiked by 1 person
Thank you!
LikeLiked by 1 person