I love a lengthy blog post, one that takes you through the inspiration, the selection (of both fabric and pattern) and the making of the piece that the blog is showcasing, but I am not sure how possible this is at the moment. Making time is short, and as I would often be rather making than writing about the making, blogs are not happening as frequently as they used to.
But I am still here!
Lachie is now 6 months old and flourishing. As I write, he is playing in front of me, stark naked and joyful. Every so often he looks up at me with a big, big smile and laughs when I smile back. All is well.
He’s fitted beautifully into our lives, and our days are filled with the joy a wee one brings. But, as I said above, time is more limited and so the time free for creating of any sort is much more limited and so quick makes have been all that I’ve really been able to do for the past couple of months.

I have dreams though. This year, instead of a Make 9 made up of patterns, I chose 9 fabrics from my stash that have lingered for too long, that I still like and that I wanted to make up. I don’t like adding to my stash relentlessly (I definitely do not consider making clothes and buying fabric two separate hobbies!) and thought it was time for a refresh of my options.
I have, so far, made up three, and I have a further two ironed and ready to be cut out (they’re going to be incorporated into the same pattern). But firstly let’s consider the lucky three to be made up.

First up was this printed flowery cotton jersey. I hummed and hawed about this fabric for a long, long time and chose this colourway in the end. I am glad, as for me the complexity of the pattern and the vibrancy of the colours is a lot and the lighter fabric would have been even more intense for me, I think.
I decided to make up a t-shirt using my t-shirt block. I worked on this a lot over winter 2021/22, using a McCall’s pattern as a base and then adjusting the armscye and shoulders to get a good fit for me. I am quite narrow around the arm pits and I absolutely hate the feeling of restricted arms so a nice trim shape here is good for me. Just as an FYI, arm manouevrability depends on a well-fitting armscye – excess fabric below here is restricting.
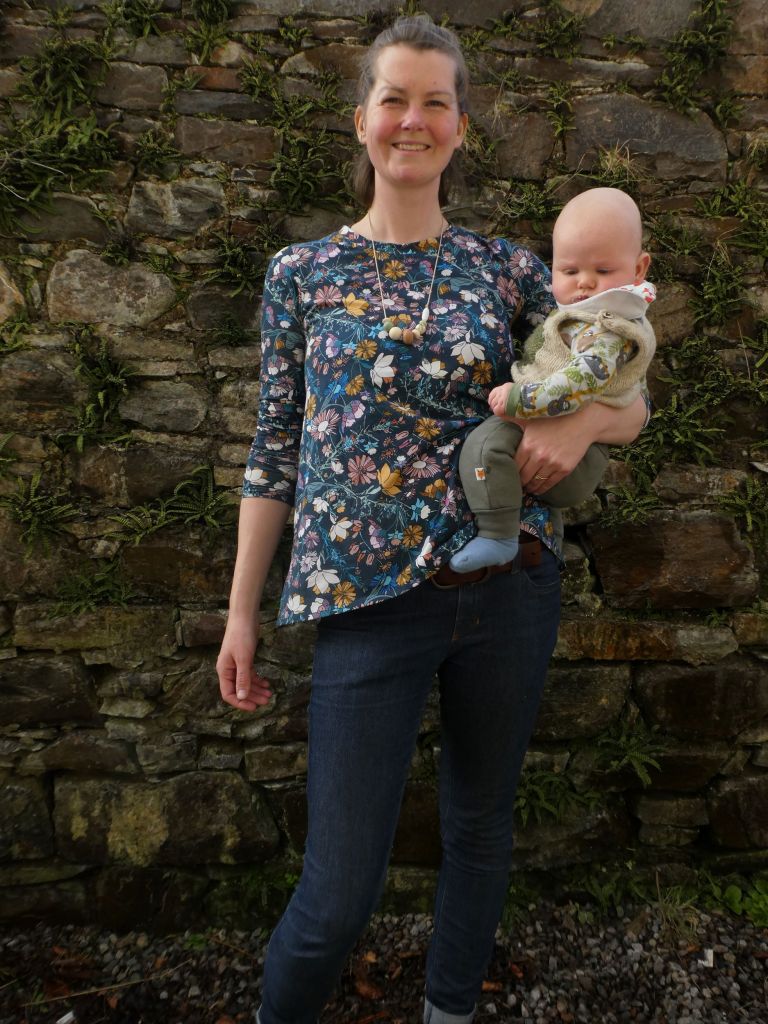
Well, I cannot tell you the pleasure to be gained from wanting a t-shirt and just pulling out my block and making it. For this I decided to widen the bottom by 4 inches on either side to create an a-line shape, and did this very simply by drawing out from the bottom of the armscye. I also chose a slightly lower neckline, but this still needs work as I made the binding too wide (5cm instead of 4) and so I’ll cut it off and redo (probably / possibly / perhaps).
A simple folded cuff on the overlocker and a nice hem on the bottom and it was done. I think I cut it out while Lachie played and sewed it up over a couple of naps in between house-y chores such as sorting nappies and cleaning etc. so it really took no time at all. One slight negative is that the bottom hem folds back on itself and I don’t know why – I’ve never had this issue before. Any advice?

Next up I chose to use some Wattle and Slate athleisure to make new leggings for yoga as I am going regularly again. I decided to used Helen’s Closet avery leggings again – my fourth pair? – as I just know it fits. The lack of pockets is a pest, but the sleek design is a good ‘un. I used my modified waistband which is halfway between views A and B and this time I cropped them to make them more exercise-y instead of relaxing-y.
This fabric is lovely, though it is 100% polyester which I normally avoid. I decided to sell the rest of the athleisure I had in my stash as it was purchased on a whim and I didn’t love the pattern. I also sold the scraps from this project as Wattle and Slate have a passionate band of followers and it helped clear my stash. Happy to have these leggings but happy not to have more of the fabric.
One thing I did find that with these, compared to cotton lycra I normally use, is that the recovery of the athleisure is much higher so these feel a bit big. Never mind, they’re still worn a lot, and not just for exercise.

Then I pulled out my very special honeymoon fabric. This was purchased in the Faroe Islands and wasn’t cheap, but the quality of the fabric makes it all worthwhile. I think it’s this jersey from Mind the Maker (note, it wasn’t purchased from the shop I’ve linked to) and I would normally never dream of spending this much per metre on fabric but I splashed out due to honeymooning and newly married enthusiasms.
Saying all that, it’s worth it. It is so, so soft. Warm and yet light, beautiful quality fabric. I highly recommend. I hummed and hawed about a pattern for this, and then decided to make another Jocko pullover, this time at the original tunic length. Well, it’s love. It’s the perfect combination where pattern and fabric are just destined to go together. It’s just utterly wonderful.

I got in a wee bit of a fandangle when the arm notches again wouldn’t match up. I pulled out the paper patterns and checked the notches and couldn’t make it make sense, so instead just folded the arms in half , attached the middle point to the shoulder seam and then worked from there. And it’s perfect, so I don’t know what’s happened with my notches (could it be the pattern??) but I will keep it simple and follow my new method in future.
I haven’t yet stitched down the folded neck beyond at the seams but I might yet do it, if I ever remember to get suitably coloured thread. Who knows when/ if that’ll happen. I popped a good label in place to help me find front and back and sewed on a wee Faroese flag to remind me that this is a honeymoon make. As an aside, I really loved how in every craft (knitting and sewing) and visitor attraction (tourist information, museum etc) shop, they had wee bowls of these Faroese flags. Such a simple detail but really perfect: the tourist board has put a lot of thought into that detail.
The Jocko is undoubtedly one of my go-to patterns. It is so perfect for breastfeeding with the side splits, has a certain casual easiness and the high neck is perfect for baby wearing and keeping cosy. I love, love, love my black and white stripy one and love this one even more (if that’s possible). Definitely a sign of a good pattern. I will try the other view next time!

And so there we have it: fifth month of the year and three out of nine stash fabrics sewn. Writing this now I realise that this post could also double up as a celebration of a Tried and True pattern – all these are patterns that I know work for me, or have been adjusted to ensure the perfect fit, and all will be worn often. It’s a post of subtle wins, perhaps!
I do have a wee bit left over of the flowery jersey, and quite a bit of the yellow sweatshirting, but they will both find a use elsewhere (pants out of the flowers, and a wee onsie for Lachie out the mustard perhaps!) and now I just need to find the brain-space and time-space to conquer a larger project in the shape of my dungarees.

But my creativity isn’t limited to the sewing. I have also been repurposing old boxes into raised beds for growing vegetables, growing said vegetables, and teaching myself dry stane dyking in order to create a permanent bed for my rhubarb and strawberries. And, I am finally knitting Joey a jumper, have been mending and repairing anything that needs it, have a couple of baby gifts to create and so on and so forth. And then, there’s also Lachie is look after, work to attend 2.5 days a week and general life stuff too… the time passes well, I find.

I wonder if pressing that hem under a couple of times would help? And then pressing it flat a few more?
Love seeing your makes including your little guy! Time flies. Best, Deb
LikeLike
I did a lot of pressing while making but ironing after it was complete is not something I tried! 🤣 I’ll give it a go, thank you!
LikeLike
I have had the same issue with my hem flipping up on t-shirts I have made. I always thought that maybe if I had managed to sew over the cut edge with my zigzag rather than within the seam allowance, leaving a small amount of the cut edge to curl, it might be better. However, I have never methodically tested the idea.
Also, dry stane dyking? So cool! I looked it up once and saw some very beautiful examples. What a cool thing to learn.
LikeLike
I do wonder if it’s the stitch I chose. On a whim I selected the stretch stitch that creates a wavy line. It’s so pretty but even though I used my walking foot, perhaps it did stretch the fabric a bit.
Thank you! I loved learning and my next wall will be better than my first!
LikeLiked by 1 person